Showing posts with label Insulation. Show all posts

Wednesday, January 19, 2011

Five No-Brainer Shortcuts to Reduce Your Electric, Gas, and Water Bills

home power savings

You hear the idiom all the time - there is no free lunch.  And while that is almost always true, it doesn't mean that there aren't shortcuts to an end goal.


If you've read this site or taken advantage of the free subscription to it, you've undoubtedly noticed that even though the projects and and products I've profiles are generally simple, most require some background work and following a methodology.


The reason is simple - if your goal is to reduce your utility bills, the best approach is a methodical one that begins with understanding how your household uses electricity, gas, and water, and where you can improve.


But what if I were to tell you that there were a number of actions you can take without worrying about method?  Steps that are so low cost and so likely to reduce your bills that you can just dive in...

There are a few such steps that we'll take a look at today.

Sunday, January 2, 2011

In Case You Missed It - Most Important Articles of 2010

As 2010 comes to a close, Home Power Saver celebrates its 4th month in existence.  And what a four months it has been!  I've posted over 50 times and have seen the site double in popularity each month.

But in this blog format, it is easy to miss or lose track of older posts.  For those wondering where to start in reducing your electric bills, or simply where to start in making your home efficient, your day has come.  Today, I am going to quickly recap the most popular posts of 2010 at Home Power Saver, and next week we'll look at the posts most helpful to Home Power Saver readers.


Thursday, November 18, 2010

Three Ways to Reduce Water Heating Costs

Hot water heaters are often the most overlooked appliance in ones home.  They sit in the basement (or garage if you live in a temperate climate) and just do their thing.

Most home owners only tend to them if the pilot light goes out (which is more and more rare in newer units), or when they spring a leak.

However, with minimal effort, you might be able to significantly reduce the costs of heating water in your home - without replacing your hot water heater.  After all, reducing your gas or electric bill is the ultimate goal of this site!

With winter knocking on the door, now is the time to expend this little bit of effort.

Wednesday, October 6, 2010

How To Insulate Your Garage Door in Two Hours

Garage Door Insulation
Garage Door Insulation Kit
Growing up in the central/northern plains, my bedroom was on the north and west side of the house.  To top it off, it was over our garage, making for a very cold room.  A little garage door insulation probably would have made that part of the house much more tolerable.

Many garage doors these days are un-insulated and light weight metal that simply transfer heat and cold.  In the Arizona low desert, cold weather is only a concern for about 2 months, and hardly that if you live in an urban area.  But even here, garage door insulation often makes sense. In the summer the surface temperature of the garage door can reach 140 degrees!  That heat radiates into the garage, and if you have living space over the garage, it radiates straight up into your living area.

Luckily, it is very easy to retrofit insulation onto a garage door.  Fiberglass and polystyrene garage insulation kits can achieve R5 to R8 insulation values, providing not only excellent thermal protection, but also some noise reduction.  As simple as this project is, there are (as always) a few options and considerations to take into account.

Friday, October 1, 2010

Adding Attic Insulation - Part II

Blown-in insulation
In Part I we looked at the basics of attic insulation, including the primary types, pros and cons of each, R-values, and briefly touched on the fact that adding insulation have have a great 'return on investment'.

Before embarking on this project, however, we should look at the "return on investment" aspect with a bit more depth.  For most people, it will be important to have a general idea of how much insulation should be put in, and how much they will save.

Is This Project 'Worth It'?

The good news is that you can actually pretty clearly calculate the affect that adding attic insulation will have.  The National Weather Service calculates climatic numbers that can be used in this calculation.  These numbers, called Heating Degree Days and Cooling Degree Days, measure how extreme your winters and summers are by measuring how often and how much you deviate from 65 degrees. These values directly relate to how much you need to heat and cool a home.

Thursday, September 30, 2010

Just in Time for Winter – 14 Inches of…

Cellulose Blow-In Insulation
For most of the country, combining the words “winter” and “14 inches” usually means one thing – a lot of snow.  However, as a rough guideline, 14 inches should be a minimum amount of insulation in your attic. More specifically, an R-value of up to 49 is recommended for most of the country.

We'll talk about R values in a minute, but the important thing to be aware of is that many houses - especially older houses (10 years and older), could GREATLY benefit from a little extra insulation.  As time progresses, many insulation types settle and compact and lose some of their efficiency.  Many older houses never had enough insulation to begin with.

As an example, a typical home in Phoenix, AZ could achieve a 12% return on investment by increasing their insulation from R20 to R35.  7% can be achieved going from R30 to R40.  And in a more extreme climate like Boston, MA, 22% and 13% can be achieved.  Move to Minneapolis, and the numbers get better still.  Good luck getting ROI's like that in any other investment!  Part II will look further into the payback and return on investment of this project.  Needless to say, this is one project worth strongly considering, even if you already have a good R30 base of insulation.

And the great news is that with the help of a friend, a little knowledge and planning, adding insulation can be a half day project in most homes, so long as a few precautions are taken.

Tuesday, September 14, 2010

Low Tech, High Results - Sealing and Insulating Electrical Outlets

There is one simple upgrade that almost every house will benefit from.  You’ll have greater comfort, less drafts, and see energy savings in summer and winter.

What is this simple, low tech upgrade?  It is electrical outlet insulation pads (aka wall-plate insulation, or foam gaskets).
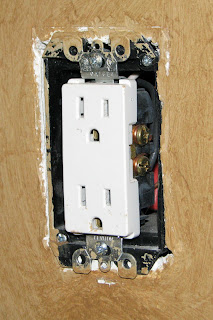

Decora Outlet Showing Insulation Gap
Decora Leviton Style Outlet
When electricians install power outlets or light switches, they cut a hole in your drywall and leave an area that has no or minimal insulation (see photo at left).  This presents an easy path for outside air to enter your home (aka ‘air infiltration’).

In fact, this gap presents such an easy entry point that in many houses you can literally feel the draft on cool and windy days.  To demonstrate this point, my new construction house in the Arizona desert (not exactly a location known for cold) was actually quite drafty in the winter until I added my wall-plate insulators.

The solution for this is quite simple – purchase a few packages of foam wall-plate and switch-plate insulators (sometimes called ‘foam gaskets’), and install them.

The biggest ‘trick’ to installing these is actually purchasing the correct type/shape in the first place.  the gaskets/insulators are designed to create a tight fit, and made to fit the exact size of the protrusion in the outlet.

Electrical sockets are generally the same in most construction (with some exceptions - especially GFCI outlets).  However, switch plates vary drastically depending on the age of your home.  Recent construction uses ‘decorator’ or ‘decora leviton’ style switches, which are large, flat, rectangular shaped rocker switches or outlets.  The photo above is a Decora style outlet, which is one of those "exceptions" I just mentioned.

Older construction uses much smaller switches that protrude from the wall a half inch or so.   You can either purchase the Gasket Covers by themselves, or part of a kit that includes door sweeps at Amazon.  Note that the kit linked to the left is for the older style outlets and switches.  The best source for Decora Leviton style gasket covers seems to be outletsealers.com.

Decora Outlet With Foam Insulation Gasket
Foam Gasket Placed On Outlet

You can also purchase small packets of insulators from your local hardware store or from a number of online sources.  However, your best bet is online sources, where you can purchase bulk quantities at a discount. 

As an example, you should be able to find 50 foam gaskets for around $18 or less online, but you'd probably pay double that at the home improvement store.   Further, you’ll be more likely to find specialized gaskets to fit those multi-gang switch plates that cover multiple switches. 

It’s difficult to estimate payback on this improvement because air infiltration alone is not enough to calculate energy consumed.   You would need to know how much air infiltration is occurring, the average temperature deviation from your preferred temperature for that air, and then factor how efficient your heating and air conditioning system is in dealing with that air.  So for this one you’ll have to take my word on the value. 

Foam Outlet Gasket Installation

Installation could not be much simpler.  If you’re like me, if you try to estimate the number of outlets and switches you have on outside facing walls, you will definitely underestimate the quantities.   Your best bet is to survey each room and keep a tally.

All it takes is removing the wall plate, inserting the foam (see photo), and then screwing the wall plate back on.  Best practice would be to turn off the breaker prior to performing any action with the wall plate.